Tonal Correction
On this page
Adobe Photoshop & Elements
Graphic Converter
Microsoft Photo Editor
Frequently, images are either too bright, too dark, or do not have an adequate tonal range of light tones to dark tones. Correcting an image's tonal range will remap the darks and the lights of the image to have a good distribution of tones, with the right amount of contrast.
Adobe Photoshop & Photoshop Elements
In Photoshop & Photoshop Elements, the easiest tool to change the tonal range of an image is the Brightness and Contrast command. Unfortunately, this type of adjustment can do just as much harm as good, correcting one problem, but creating another. A better choice and just as easy to use, is the Levels command.
A Levels adjustment can be applied directly to your image by going to Image Menu > Adjustments > Levels (Photoshop) or Enhance Menu > Adjust Brightness/Contrast > Levels (Photoshop Elements). The Levels adjustment will change the pixels directly, limiting your options later if you change your mind. As an alternative, you can use an Adjustment Layer, placing your adjustment on a separate layer, allowing you to change the Adjustment Layer at any time, discard it or even lessen the effect by bumping down the opacity of the layer. The actual pixels of the image are left untouched.
|
|
- Click the Auto Button on the right side. This often can be a quick way to get an acceptable image. Auto Levels will cause the lightest tone to be white and the darkest tone to be black, adding contrast to the image, and it will frequently adjust the color. If you do not like the way the image was adjusted by the Auto button, hold down the Option/Alt key, the Cancel button will turn into a Reset button, click on it to begin again.
- To correct the contrast of the image, move the Shadows slider (circled in gray in the example below) to the right until it is below the graph area (histogram) at the beginning of the peak black area. You want to pick a spot where the black rises to a few pixels above the base. Think of it as setting the slider adjacent to the beginning of the foothills to the mountain. Do the same with the Highlights slider, sliding it to the left. This will assure that your image has deepest blacks and whitest whites. See example, below.
Before
After
- If the overall tone of the image is still not quite right, you will need to adjust the midtones of the image. Use the middle, or Midtone slider (circled in red in the example, above), beneath the graph or histogram. Drag the slider to the left to lighten the image, drag to the right to darken the image.
- Click OK when you have finished adjusting the image. In the Layers Palette you will see an adjustment layer added above the layer you were currently working on. This Levels adjustment layer can be toggled on or off by clicking on the eyeball to the left of the layer in the Layers Palette. The opacity of the layer can be adjusted to lessen the effect of the adjustment by clicking on the triangle next to the Opacity field at the top, right of the Layers Palette, and adjusting the slider.
- To change the Levels adjustment settings, double-click on the left icon in the Levels adjustment layer (circled in red in the example, below) and the Levels dialog box will reopen. Change the settings, click OK and your adjustment layer will be changed.
Graphic Converter (Mac Only):
Graphic Converter has similar tonal correction tools to Photoshop and Photoshop Elements. The Levels commands works much the same in Graphic Converter. There is an Auto Levels to correct contrast automatically. There is a Brightness and Contrast command that is more deluxe, more useful than Photoshop's. Because it offers the ability to work on separate colors at a time, it will be covered in the Color Correction section.
|
|
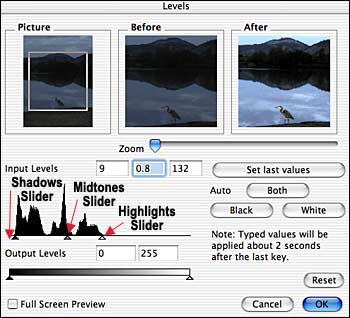
- Alternatively, you can manually adjust the Shadows and Highlights sliders by dragging the triangles under the graph, inward from the edges, as shown in the above example.
- Adjust the middle (Midtone) slider to the left to darken the midtones of the image and to the right to lighten them (opposite of how Photoshop's & Elements' midtones slider works).
- Click OK when you are done. The adjustment will happen directly to the pixels of your image. It is best to save the file with a different name to not overwrite the unadjusted version. Go back to the original version if you want to try another setting.
Microsoft Photo Editor (PC Only):
Microsoft Photo Editor has an automatic image balance command (Auto Balance) and a manual one (Balance).
To automatically adjust your image, choose Auto Balance from the Image Menu. The dark tones and light tones in your image will be redistributed from black to white, usually adding contrast to the image.
To exert more control over the adjustment, use the manual adjustment:
- From the Image Menu, choose Balance.
- The Balance dialog box opens up.
- Slide the Brightness slider to change the brightness of the image. This setting changes the amount of white in all colors and shades of gray, effectively lightening or darkening the image.
- Slide the Contrast slider to increase or decrease the amount of contrast between light and dark colors.
- Slide the Gamma slider to change the contrast in dark areas of the image, effectively lightening or darkening the image.
- You can change individual colors by pulling down the All colors menu (see the section on Color Correction).
- Click OK when done.
