On this page
Sizing Images
Sizes Defined
About Sizing Images for the Web
Before Resizing Images
Resizing Images
Adobe Photoshop & Elements
iPhoto
Graphic Converter
iResize
Microsoft Photo Editor
Sizes Defined
When you speak of the size of an image, you could mean:
- The size the image will display on a monitor.
- The physical size the image will be when printed out.
- The amount of space it takes up on your hard drive, described in bytes, kilobytes (K), or megabytes (MB).
For preparing images for the web, we need to be concerned with #1, the size the image takes up on a monitor, and #3, the size in kilobytes for faster delivery to web pages (discussed in the section on Saving files for the Web).
About Sizing Images for the Web
- When sizing images for the web, the issue of how many pixels are captured is important to consider. It is a good idea to start thinking in pixels rather than inches.
- If you capture too many pixels, your image will take up too much of the monitor's screen. If you capture too few pixels, your image will be postage stamp size and not easily readable.
- You would not size an image for the Web the same as you would size an image for print. For print, the resolution of the image described in dpi (dots per inch) or ppi (pixels per inch) is very important. For the Web, if you can set the pixel dimensions of your image, you do not need to be concerned with the resolution.
- Below are examples of various sizes described in pixels and also inches for scanning purposes.
 70 pixels wide x 52 pixels tall 70 pixels wide x 52 pixels tall
Too small for most purposes. Scan size = 0.972" x 0.722" at 72 ppi |
Just a little bit larger, but because the subject is a larger form without too much detail, it is acceptable. Scan size = 1.125" x 1.389" at 72 ppi |
|
200 pixels wide x 100 pixels An image with a lot of smaller detail. This size is about the smallest you would want for an image with mostly small detail. Scan size = 2.778" x 2.083" at 72 ppi |
307 pixels wide x 250 pixels tall About the largest size you need for most purposes. Scan size = 4.264" x 3.472" at 72 ppi |
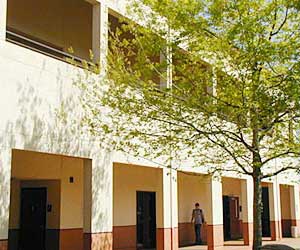
 81 pixels wide x 100 pixels tall
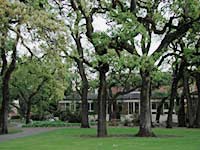
Before Resizing Images
Crop
If your image needs to be cropped, removing areas of the image along the outside edges, you should crop first before resizing. See the section on cropping.
Set Viewing Percentage to 100%
When sizing your images, it is important to view your image at 100% so you can see how big it will be on a web page. Web browsers will display your image on the monitor at 100% only. In most image editing programs, you will be able to zoom in or out on an image, viewing the image at various percentages of the actual size. Changing the view percentage does not affect the actual image or how large it will print, just the way the monitor displays the image within the program.
- Look to the bottom of the document, or on a PC the bottom of the monitor. Normally, this is where you can see the the view size percentage. If the program has a tool bar across the top of the screen, frequently there is a view percentage setting there.
- Depending on the program, try one of these choices:
- Click and drag to select the percentage amount and type in another amount.
- Click and hold to see a drop down menu with choices of various percentages.
- Look for a View Menu, click to see choices, choose a view percentage from the list.
- Choose the Zoom tool (usually looks like a magnifying glass) from the tool bar and click on the image to enlarge the view until it is 100%. Hold down the Option (Mac) or Alt (PC) key if you need to reduce the percentage.
Resizing Images
All large image editing programs and many smaller image editing programs will allow you to resize an image. A few have been picked to demonstrate below.
In Adobe Photoshop or Adobe Photoshop Elements (Windows & Mac):
- Open Adobe Photoshop or Adobe Photoshop Elements.
- Go to the File Menu and choose Open, browse to your image and open it.
- In Photoshop, go to the Image Menu and choose Image Size to open the Image Size dialog box.
In Photoshop Elements, go to Image Menu > Resize > Image Size
- Make sure that "Constrain Proportions" and "Resample Image" are checked on.
- Change the Pixel Dimensions to a reasonable size. Usually you don't need the image to be larger than 300 pixels on either side.
- Scaling down will give you a much better image than scaling up. Always try to capture enough pixel information so that you do not need to scale up. Next to Pixel Dimensions you see that the image was 610 K and now will be 219 K. If the new number is lower than the original number (next to "was") the image will be scaled down.
- Click OK.
- Make sure your viewing percentage is set to 100% to adequately see how large your image will display on a monitor. If you sized the image too small, undo (Command Z for Mac, Control Z for PC) and try different settings. Don't size back up after sizing down, your image quality will suffer.
- Save your file. You will need to save it in a form to be recognizable on the web (see the section on Saving files for the Web).
In iPhoto (Mac Only):
- To work on images in iPhoto, you must first import the image into the iPhoto library.
- View instructions for importing photos from a digital camera directly into iPhoto with a USB cable on Apple's Web site. You must have a compatible camera to do this.
- Import a photo from your hard drive or disk, by going to the File menu and choosing Import to Library.
- If you want to change the crop or proportions of your image, use the Crop tool first.
- When you are ready to resize the image for Web delivery, click on the image ONCE in the iPhoto library. You do not want to open the image, just select it.
- Choose > File > Export.
- In the dialog box, click on the Format drop down menu. Choose JPG.
- Click on the radial button labeled "Scale images no larger than" and type in your new file size in pixel amounts in the width and height fields.
- Click on the Export button. A new dialog box opens allowing you to name the image and choose where to save it.
In Graphic Converter (Mac Only):
- Open Graphic Converter
- Go to the File Menu and choose Open, browse to your image and open it.
- From the Picture Menu, choose Size and then from the list, Scale
- In the Scale dialog box, make sure that Keep Proportions and Scale Picture are checked on near the bottom of the dialog box.
- Next to Width, click on the drop down menu and choose Pixel (circled in red). Change the Pixel Dimensions to a reasonable size. Usually you don't need the image to be larger than 300 pixels on either side.
- Scaling down will give you a much better image than scaling up. Always try to capture enough pixel information so that you do not need to scale up.
- Make sure your viewing percentage is set to 100% to adequately see how large your image will display on a monitor.
- To save the file, go to the File Menu and choose Save As. In the Save As dialog box, choose JPEG from the Format drop down menu.
- Click the Options button to set the Quality. See the Saving files for the Web section for a discussion about the quality setting.
- Click Save when you are done.
- You can easily size images to the same size by going to Picture > Size > Scale with Last Values.
In iResize 1.0 (MAC OSX Only):
Resize by Width Only, No Cropping
Supports only JPEG, PCT, TIFF and PSD files
- Open iResize
- Click on the "Load one image" button, browse to your image and click Open OR
Drag and drop an image to the "Drop one image here" box on the right side of the iResize interface. You must pick an image that is a JPEG, PCT, TIFF or PSD file. - Under "Image resize settings" in the top, left of the interface, slide the Width slider or type in a number to set the width amount in pixels. The height will be adjusted in proportion.
- To save your file, click on the "Export one image" button (under the Width setting). In the "Export Image As" dialog box, choose the JPEG file type from the drop down menu.
- Click on the "Options" button to set the Quality. Without clicking on the "Options" button, your file will be saved with a Medium Quality. See the Saving files for the Web section for a discussion about the quality setting.
In Microsoft Photo Editor (Windows Only)
Comes pre-installed on Windows XP machines, also comes with Microsoft Office 97 or later and Microsoft Works Suite
- Right-click on an image and choose Microsoft Photo Editor to open the image, OR
Open the Microsoft Photo Editor program, from the File Menu, select Open, browse to the image you want. - Go to the Image Menu and choose Resize
Set the Units to Pixels (as shown in red circled setting).
Change the Pixel Dimensions to a reasonable size. Usually you don't need the image to be larger than 300 pixels on either side.
- Set the view to 100% to adequately see how large your image will display on a monitor. From the Tool Bar, click on the Zoom Control drop down menu (as shown below, circled in red) set to 100%.

- To save the file, go to the File Menu and choose Save As. In the Save As dialog box, choose JPEG from the Save as Type drop down menu.
- Click on the "More" button to set the Quality. See the Saving files for the Web section for a discussion about the quality setting.
