On this page
How big is your image
Optimizing defined
Optimizing with Photoshop & Elements
Saving as a JPEG (Photoshop)
Saving as a GIF (Photoshop)
Optimizing & saving with iPhoto
Optimizing with Graphic Converter
Saving as a JPEG (Graphic Converter)
Saving as a GIF (Graphic Converter)
Optimizing with Microsoft Photo Editor
Saving as a JPEG (Microsoft Photo Editor)
Saving as a GIF (Microsoft Photo Editor)
When saving images for the web, you need to use an image editing program to:
- Save your file in a format that is recognizable by web browsers.
The two widely used image formats for the web are GIF and JPEG.
Images with continuous tones (gradual changes in tones or colors), such as photographs are best saved as JPEGs.
Images with areas of solid color such as logos and type are best saved as GIFs.
Save as JPEG
Save as GIF
NOTE: In order to save your file as a JPEG or GIF, you must use an image editing program such as the ones listed below. Just changing or adding an appendage of .jpg or .gif will not actually change the image into one of these formats. - Compress the file for fast internet transmission. This is called Optimization.
Apply compression to your image to reduce the file size. Again, you need to use an image editing program to set the amount of compression that is applied to an image. The quality and size of your image can differ by what settings you use to compress your image. - When saving a file for the web, you must not only use letters, numbers, dashes, underscores, or periods. The file name needs to end with a period and the appropriate extension, i.e. .jpeg, .gif. Do not use spaces, punctuation, or other characters in your titles.
How big is your image, a tale of Bytes, Kilobytes and Megabytes
When choosing your settings for saving as a JPEG or GIF, you need to keep an eye on how big your resulting image will be to make sure it will download quickly on the web. Usually, you will be looking at kilobytes (K) unless the image is extremely small, than it will be in bytes.
A bit is the smallest unit of information on a computer. A byte is made up of 8 bits. A kilobyte (K) is 1,024 bytes, and a megabyte (MB) is 1,024 kilobytes.
Any image over 1MB is way too large for the web. Try to keep your images below 30K each. Only go over 30K if you just have one image on the page. If you have many images on a page, try to save your images in smaller sizes.

Image saved as a GIF is 480 bytes. |
|
|
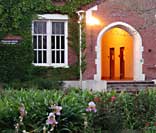
Image saved as a JPEG is 10K. |
|

Optimizing = Sacrificing quality for smaller files
Selecting compression settings (optimizing) is a balancing act between getting an acceptable looking image and an acceptable size for quick transmission. You have to give up some in image quality to get a smaller size file.
When applying optimization to JPEGS, you will begin to see artifacting, causing your image to look blurry with some errant colors.
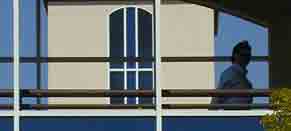 |
Artifacting To the left you can see the artifacts, especially in the blue sky behind the figure. |
Saving as a GIF involves choosing how many colors are absolutely needed for the image to look acceptable, the rest of the colors will be thrown away to compress the image smaller.
In the example below, the image appears to have just 4 colors, black, yellow, green and the white background.
 16 Colors |
|
The example on the left was saved with 16 colors. The right example was saved with 4 colors. You can see that the edges of the image look blocky. That is because additional in-between colors are needed for the edges to look smooth. For example, gray colors are needed for the transition between the black edges next to a white background.
|

Optimizing in Adobe Photoshop or Adobe Photoshop Elements (Windows & Mac):
When saving as a JPEG or GIF in Photoshop and Photoshop Elements, there are two methods. Using the Save As command or the Save for Web command. The Save for Web command is the better choice, offering you more options and the resulting files are more compatible in all situations, so Save for Web is the method shown below.
Saving as a JPEG using Save For Web
- With your image open and ready for saving, go to the File Menu and choose Save For Web. A large dialog box opens up.
- At the top, left you will see a set of tabs (Photoshop only). Choose either 2 Up or 4 Up so that you can compare your optimization settings on different displayed versions of your image (Photoshop Elements will show 2 displayed versions). The first version represents your original without any optimization settings. By default, the second version will be selected. The selected version has a highlighted frame around it.
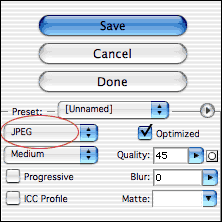
- Set to JPEG:
On the right hand side of the dialog box is where you find the settings. From the first drop down menu on the left (circled in red in the example below), choose JPEG. - Quality Setting:
- A higher quality setting adds less compression, making the file larger in download size.
- A low setting adds more compression, compromising the quality but ending up with smaller images that download quicker.
Underneath the JPEG setting is the pre-set quality setting. The pre-set choices are Low, Medium, High, Very High or Maximum.
For more control of the setting, set the quality by number. To the right of the pre-set, you can click on the Quality drop down to access a slider for choosing the quality. The number will change as you slide. The range of quality goes from 0-100. You can also type in a number. 40 is a good number to start with.
Compare the version to the original. Take note of the file size and download time listed under the version preview. Try to keep your images below 30K.
- Click on another version (Photoshop only) and try a different quality setting. Compare the previews to see if one is noticeably better or worse and compare the size and download time.
- When you have a version set to the quality that you feel best compresses the image without too much degrading of quality, make sure it is the selected version by clicking on it. Click on the Save button at the top of the Save for Web dialog box.
- The Save Optimized As dialog box opens up. In the first field, next to Save As you can set the name of the file. Browse to where on your hard drive you want the JPEG to be saved to. Click the Save button at the bottom of the Save Optimized As dialog box. Your JPEG will be saved to your hard drive, but the original image is what is left open in Photoshop or Photoshop Elements.
Optimizing in Adobe Photoshop or Adobe Photoshop Elements (Windows & Mac):
Saving as a GIF, using Save for Web
- With your image open and ready for saving, go to the File Menu and choose Save For Web. A large dialog box opens up.
- At the top, left you will see a set of tabs (Photoshop only). Choose either 2 Up or 4 Up so that you can compare your optimization settings on different displayed versions of your image (Photoshop Elements will show 2 displayed versions). The first version represents your original without any optimization settings. By default, the second version will be selected. The selected version has a highlighted frame around it.
- Set to GIF:
On the right hand side of the dialog box is where you find the settings. There are many settings, but we will only look at the important ones. From the first drop down menu on the left choose GIF.
Color Palette Setting
The next drop down menu, (circled in red in the example) is for setting the color palette from which the colors in the image will be chosen from. Choose either Selective or Adaptive. Both are good choices that will yield a very similar result.Select the Number of Colors
The Colors field to the right of the color palette setting is for setting how many colors to use. Reducing the number of colors will lower the size of the resulting GIF. Type in a number, or click on the drop down menu to adjust the slider.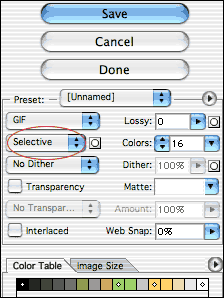
- Click on another version (Photoshop only) and try a different amount of colors. Compare the previews to see if one is noticeably better or worse and compare the size and download time. The screen shot above, shows the settings used to create an image with 16 colors. You can see under the Color Table tab, the 16 colors are displayed.
- Leave the Dither set to No Dither. If you have an image with continuous tones, such as a photograph or image with drop shadow or a blend, you can experiment with adding a dither. Adding a dither will increase the file size.
- Leave Transparency turned off unless you want to have portions of the image be transparent.
- Compare the version to the original. Take note of the file size and download time listed under the version preview. Try to keep your images below 30K.
- When you have a version set to the amount of colors that you feel best compresses the image without too much degrading of quality, make sure it is the selected version by clicking on it. Click on the Save button at the top of the Save for Web dialog box.
- The Save Optimized As dialog box opens up. In the first field, next to Save As you can set the name of the file. Browse to where on your hard drive you want the GIF to be saved to. Click the Save button at the bottom of the Save Optimized As dialog box. Your GIF will be saved to your hard drive, but the original image is what is left open in Photoshop or Photoshop Elements.
Optimizing and Saving in iPhoto (Mac Only):
iPhoto allows you to save an image as a JPEG, but does not give you controls for setting the level of optimization.
- To work on images in iPhoto, you must first import the image into the iPhoto library.
- View instructions for importing photos from a digital camera directly into iPhoto with a USB cable on Apple's Web site. See Apple's page on troubleshooting camera connections.
- Import a photo from your hard drive or disk, by going to the File menu and choosing Import to Library.
- When you are ready to resize the image for Web delivery, click on the image ONCE in the iPhoto library. You do not want to open the image, just select it.
- Choose > File > Export.
- In the dialog box, click on the Format drop down menu. Choose JPG, you cannot save as a GIF in iPhoto.
- Click on the radial button labeled "Scale images no larger than" and type in your new file size in pixel amounts in the width and height fields.
- Click on the Export button. A new dialog box opens allowing you to name the image and choose where to save it.
Optimizing in Graphic Converter (Mac Only):
Saving as a JPEG
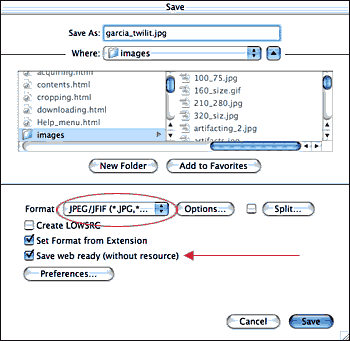
- If you have made changes to your image in Graphic Converter, that you would like to keep, save the image before saving as a JPEG. When you are ready for saving as a JPEG, go to the File Menu and choose Save As.
- In the Save dialog box, set the format to JPEG (circled in red in the example, below). Make sure that the "Save web ready (without resource)" button is checked on (as shown by the arrow in the example, below). Change the name if you desire at the top of the box, next to Save As. Browse to where you want to save the JPEG on your hard drive and click the Save button.
- The JPEG/JFIF dialog box will open. At the top of the dialog box is a Quality slider allowing you to set the quality from 0 to 100. You will see a display of your original image (Before) and one with the settings applied (After). Adjust the slider as low as possible yet still maintaining adequate quality in the After display.
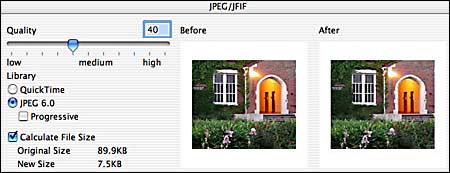
- Make sure that Calculate File Size is clicked on, take note of the file size.
- When you have a version set to the quality that you feel best compresses the image without too much degrading of quality, click on the OK button. The JPEG will be saved to your hard drive and will be left opened in the program. The original image will be closed and remain in the same state as the last time it was saved.
Optimizing in Graphic Converter (Mac Only):
Saving as a GIF
- If you have made changes to your image in Graphic Converter that you would like to keep, save the image before saving as a GIF. When you are ready for saving as a GIF, go to the File Menu and choose Save As.
- In the Save dialog box, set the format to GIF. Make sure that the "Save web ready (without resource)" button is checked on. Change the name if you desire, at the top of the box, next to Save As. Browse to where you want to save the GIF on your hard drive.
- Click on the Optimize button
- The GIF Options dialog box opens
Under Colors, check the Optimize setting on. GraphicConverter will save the image using less colors. For instance, a file that uses 28 colors will automatically be saved as a 5 bit file with the maximum of 32 colors. This will result in smaller files for the internet and other usage.
Click the OK button. The Save dialog box is still open, click the Save button and your GIF will be created.

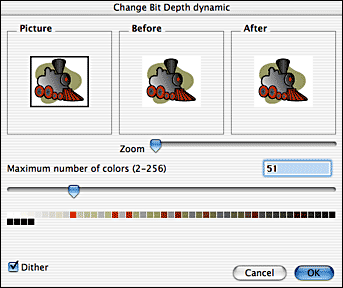
- To exert more control over the colors used in the color table:
Go to Picture Menu > Colors > Change Bit Depth Dynamically
In the Change Bit Depth dialog box, move the bottom slider to the left to reduce the amount of colors. Above the slider to the right side you will see the number reduced. Below, you see the colors that will be used in the image.
Click on the Dither box at the bottom of the dialog box to apply a dither. Use this feature when your image has gradations, drop shadows or continuous tones.
Save using steps 1-4 above.
Optimizing in Microsoft Photo Editor (PC Only):
Saving as a JPEG
- If you have made changes to your image in Microsoft Photo Editor that you would like to keep, save the image before saving as a JPEG. When you are ready for saving as a JPEG, go to the File Menu and choose Save As.
- In the Save dialog box, set the format to JPEG in the Save as type field. Change the name if you desire in the File name field. At the top of the dialog box, next to Save in, browse to where you want to save the JPEG on your hard drive.
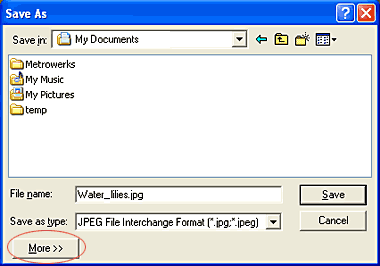
- Click on the More button (circled in red in the example, below).
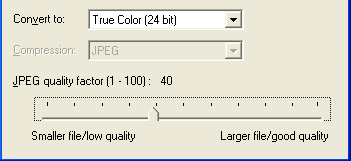
- The dialog box expands to show a JPEG quality slider (as shown below). Sliding to the left will reduce your file size and degrade the quality of the photo. As you slide, the quality number changes above the slider. Unfortunately, you will not be able to see the effect on your photo as you drag the slider. 40 is a good middle of the road number to shoot for.
- Leave the setting True Color (24 bit) set as is by default, unless you have a grayscale file, then change it to Grayscale (8 bit).
- Click on the Save button. The JPEG will be saved to your hard drive and will be left opened in the program. The original image will be closed and remain in the same state as the last time it was saved.
- The JPEG file left open will still not visually reflect the optimization settings you have applied. Close the file and reopen it to see what effect the optimization settings had on your image. If the degradation is too strong, reopen your original file and save as a JPEG with a higher JPEG quality setting.
Optimizing in Microsoft Photo Editor (PC Only):
Saving as a GIF
- If you have made changes to your image in Microsoft Photo Editor that you would like to keep, save the image before saving as a GIF. When you are ready for saving as a GIF, go to the File Menu and choose Save As.
- In the Save dialog box, set the format to GIF in the Save as type field. Change the name if you desire in the File name field. At the top of the dialog box, next to Save in, browse to where you want to save the GIF on your hard drive.
- Click on the More button only if you have a grayscale file and set the Convert to option to Grayscale.
- Click the Save button. The GIF will be saved to your hard drive and will be left opened in the program. The original image will be closed and remain in the same state as the last time it was saved.
- The GIF file left open will not visually reflect the GIF optimization. Close the file and reopen it to see what effect the optimization had on your image. You have no control over the amount of colors or dithering in Microsoft Photo Editor. The program will reduce the amount of colors used and apply a dither to the image (if you have continuous tones in your image).
