About Course Shells
Once you have logged in to Canvas, you can access your course shell(s).
Please use Distance Ed Support Request Form IF you need:
|
-
If you are an instructor, every course you're assigned to teach will automatically have a course shell added to your account. Each semester, you will have new course shells for each of your courses. You must use the new shells because that is where your currents students will be directed to in Canvas.
-
If you don't see the course shell in your Dashboard, see the Finding Your Course Shell help document.
-
Practice Sandbox course shells have been created for each instructor. Use the 3rd form in the sidebar if you don't have one and would like one.
Templates for Canvas Course Shells
Distance Education at SRJC has created Quickstart templates for your course shells that are now available in Canvas Commons for you to import. Follow these steps:
Preview of Quickstart TemplatesThe template preview includes a complete 16-week course template. You can import the entire template or particular components of it from Commons as described below: #1: Basic template with Home Page, Syllabus, Getting Started module, Week 1 module, Feedback surveys #2: 16-Week template with Home Page, Syllabus, Getting Started module, Week 1-16 modules, Feedback surveys #3: Home Page template #4: Syllabus template #5: Getting Started Module (Online Course) #6: Getting Started Module (Face-to-face Course) #7: Week 1 module template #8: Weeks 2-8 module templates #9: Weeks 9-16 module templates #10: Feedback surveys (mid-semester and end-of-semester) |
- Preview the templates before you import them; see more information in the sidebar.
- Log in to Canvas and click on the blue Commons button in global navigation.
- Use the search terms "SRJC Quickstart" to see the 10 templates available.
- Click on the resource of your choice to see more details about it and to import it.
- In the Import into Canvas sidebar, search or browse for the Canvas course shell where you would like to import the template. Select the course.
- Click on the green Import into Canvas button. The resource will import into your course.
- PLEASE NOTE: if you import a template from Commons a second time to the same course, it will overwrite the first import AND any changes that you made to the first import. Renaming or editing the components does not prevent overwriting from Commons.
In each template, you'll find text in brackets [ ] , and also in red to alert you to particular places where you'll want to insert your own unique content.
customizing your Home Page
- From the Course navigation, click on the Home link.
- Click the Edit button on the right side of the main center area to open the Rich Content Editor.
- Remove the "Note to Instructor" text above the banner by highlighting it and deleting.
- Highlight the "Your Course Name Here" text in the banner, and replace with the name of your course.
Banner Options:
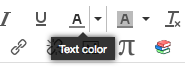
If you would like to change the color of the text, highlight the text and click on the text color icon in the tools area.
NOTE: You'll need to make sure your text and background colors have sufficient contrast to pass accessibility standards. Black (or very dark) text with a white (or very light) background is best.
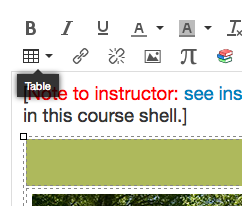
If you would like to change the background color for the text, click anywhere in the green area where the course title is located (this is a table cell).
- Click on the Table icon in the tools area.
- Navigate to Cells > Cell Properties.
- Click on the Advanced tab.
- In the Background color field, type in a 6- or 3-digit hexidecimal code after the # sign.
NOTE: See this Color Contrast Ratio Calculator page to view a table showing background colors with sufficient contrast to pass accessibility standards. Choose a color that has at least a 3.1 contrast (as indicated in the Calculator page) with black text, (or white text if you choose to change the text color).
Banner image Replacement
- DOWNLOAD images from the Banners pages—See instructions and Banner image options here
- Prepare your own image that is no wider than 1000 pixels. The default images is 1000 x 250 pixels
- Click on the image in the banner and delete, leave the cursor still in the empty cell
- Upload the image by clicking on the Images tab in the Insert Content into the Page right sidebar area
- Click on the Upload a new image link
- Click on the Browse button, browse to the image and upload, the image should appear in the banner
- Replace the red text for Important links with your own links. You don't have to put 3 links here, you can delete any or all of those placeholders. Suggestions for links: News, Announcements, Q & A Forum or other Intro Forum, Get Started link that takes you to Modules, or links to important course resources.
- Scroll down further in the editing box to see the Instructor information. Add your name, email address, and office hours.
- To put in a picture of yourself, click on the avatar icon next to the instructor information and delete it. Upload your image (follow the steps listed above for uploading an image - in the Banner image replacement area).
- Click on the Save button when finished.
Syllabus
A sample syllabus is loaded in your shell to help you fulfill all the SRJC requirements for syllabi.
- Click on the Edit Syllabus Description button in the right sidebar.
- Replace all red text and text in brackets with your information.
- If adding your own headings, make sure to use the Paragraph/Header drop down in the Rich Content Editor toolbar to set headings and choose the right heading level. The heading in place for "Course Syllabus" is a Header 1, and the other headings are Header 2. Continue to Use Header 2 for added sections. Use Header 3 or Header 4 as appropriate for nested sub-titles.
- Click on the Update Syllabus button when finished.
Modules
Click on the Modules Course navigation link and you will see a Getting Started module (Week 0) and a Week 1 module that have been placed there for you. Within these modules there are Pages, Discussions, and even a first week Quiz and Assignment are set up to help you get started. Delete what you don't need and add Quizzes, Assignments, Discussions, or Pages as needed.
The Getting Started module has a lot set up for you. Just add some text about yourself on the Meet Your Instructor page, and replace the red text on the Week 0 page and the Check-In Discussion. Notice that the other four items (Roadmap to Success in Online Learning, Navigating Your CANVAS Course & Mobile App Tips, Q&A about this course, and Support for Students Learning Online) are in green because they are published. These are fully complete as they are, and are a great resource for students to get acclimated to working in Canvas.
Discussions
- Notice that there are two Pinned Discussions. These are discussions that you want your students to see at the top of the Discussions page. Pinned Discussions will always stay at the top.
- A Q&A Discussion is placed at the top so students can use it throughout the course to ask questions.
- To get students started interacting with the class, there is a Check-In Discussion for introducing themselves to the class.
- The Discussion Week 1 is a template to get you starred on creating your own first week discussion. Consider using the Student Lounge Discussion to promote discussions about the week's topics and materials.
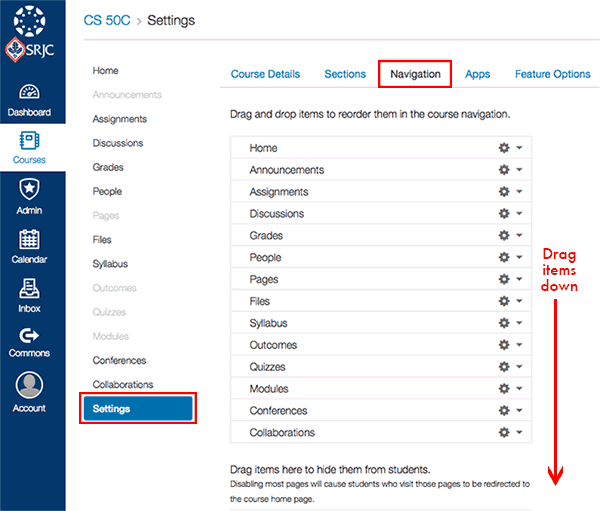
Settings
Click on the Settings button in the Course navigation. From here you can modify Course Details, Section information, Navigation, and Apps.
For more detailed information about Settings, see these Canvas guides.
NOTE: Under the Visibility section of the Course Details area, it is recommended that you check the box next to "Make the syllabus for this course publicly visible" so the syllabus can be viewed by those looking to learn more about your course. (It is NOT recommended to check "Make this course publicly visible.")
Course Navigation
Your course shell has been set up with Course navigation elements chosen to show to students, and some that have been hidden. You can make changes as you like, but should consider how the added navigation areas will help or hinder the student to be guided through the course. For instance, opening up the Files for navigation is not usually recommended because they will just see a list of files in alphabetical order, which is not too helpful and can be confusing to the student. Similarly, you may not want students to navigate all the pages alphabetically as they will appear if you leave the Pages navigation element visible. It is much better to have the students navigate by Modules where you can control the order of things.
To edit which navigation items to hide or reveal:
- Choose Settings from the Course navigation
- From the horizontal navigation at the top of the interface, choose Navigation
- Drag and drop items to the lower part of the interface where it says "Drag items here to hide them from students". The items dragged here will be hidden from the student, but not in the instructor view.