Guide to Accessibility Compliance for CANVAS Users
This page will guide you in creating accessible materials specifically in the Canvas Course Management System. Many of the accessibility rules and guidelines are handled for you in the Canvas system. See the Web Accessibility Checklist to read about accessibility guidelines. See the "Accessibility within Canvas" document on the Canvas Community site for more information on Canvas and accessibility.
Images and alternative text
Whenever you place an image on a page, it is necessary for accessibility compliance to enter a suitable text alternative for students who can't see the image. In the Canvas system, you place images on pages using the Rich Content Editor in two ways:
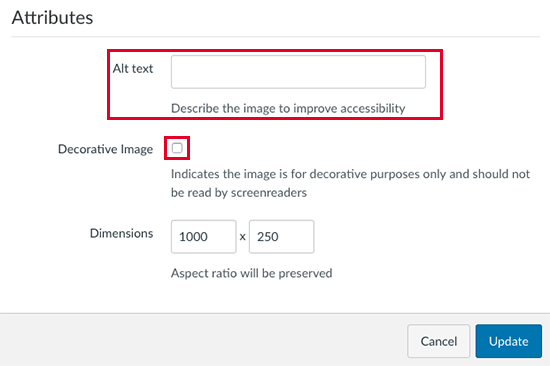
- Use the Rich Content Editor Embed Image tool (mountain scene) to insert an image. After choosing the image to place, you will be presented with an Insert / Edit Image dialog box that contains an Alt text field for placing alternative text. The Alt text field will be automatically populated with the name of the image. Almost always, the name of the image is not effective alternative text. Type into the field a short, descriptive phrase about the image.
- When using the Insert Content into the Page right sidebar, you can upload and choose your image from the Images tab. Using this method, the Insert / Edit dialog box does not open. You will need to click on the image and then click on the Embed Image tool in the Rich Content Editor toolbar to access the dialog box and change the Alt text field to more suitable text.
Do not include "image of" or "picture of" in the Alt text, just the description. If there is text in the image, be sure to include it in the Alt text. See this page on writing effective alternative text from the WebAIM site. For more information on how to embed an image in a Canvas page or other asset, see the "How do I embed images from Canvas into the Rich Content Editor" Canvas Guide.
Decorative images
If the image is purely decorative and does not convey meaning, it is best to indicate empty or "null" alternative text, thereby signifying to the screen reader that the image should be ignored.
Canvas gives us the ability to designate an image as decorative. Click on the Embed Image tool in the Rich Content Editor toolbar and then in the Insert/Edit Image dialog box click on the "Decorative Image" checkbox. You do not need to add or delete anything from the Alt text field.
Headings
The longer the page, the more important it is to use headings to allow a screen reader user to scan a page or easily jump to the content they need. You can apply headings to text in the Rich Content Editor by utilizing the Paragraph/Header drop down. If you are pasting in a large amount of text into a page, you will need to add headings using this tool. Do not simulate headings by just adding bold to text.
You can designate heading levels from Header 2 through Header 4. Header 1 is reserved for the page title. Start with Header 2 and apply the tags throughout the page in a descending order as the content warrants. If you set the first heading to Header 2, and then have content that is a sub-section of that, use Header 3. You can go back to a Heading 2 for the next heading if that best describes the hierarchy of your content. Do not skip headings, e.g. following a Header 2 with a Header 4.
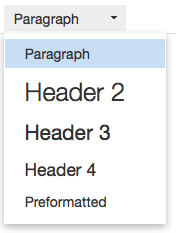 Select the text, access the Paragraph/Header drop down menu (the drop down will say Paragraph in most instances, but may reflect your last choice), choose the desired heading tag based on your content. If you find that the heading is being applied to more text than you want, undo and then put your cursor before the text you want to be a header. Backspace until the text is on the same line as the previous text, then hit the Return or Enter key to go to another line. Behind the scenes your text will be separated into separate paragraph tags. Highlight the heading text and set the heading level again. You may find that you need to do this to separate text after the heading text as well as before it so that the Header gets applied to just the text you desire.
Lists
Placing headings is one way you create "semantic markup" – meaning the code that creates your pages is using the best tags for accessibility (and for search engine optimization). Other ways you can create better semantic markup is to use a real HTML list instead of simulating one. In Canvas it is simple to create a list, very similar to creating a list in Word.
- In the Rich Content Editor, select the text and then click on the Ordered List button or Unordered List buttons.
- Nest lists by using the Indent buttons (formatted text icon with arrow to the right).
Multimedia
If you are using video files, to support deaf and hard of hearing students, you will need to make arrangements to have synchronized captions added. Audio files will need text transcripts. There is an easy way to order captions and transcripts through 3C Media Solutions (provided by the Chancellor's Office). See the procedures on the Multimedia Accessibility page. Contact the Distance Education Assistive Technology Specialist for more information and assistance.
Canvas offers a way to record multimedia within any page, discussion, quiz, assignment, or announcement by accessing the Record/Upload Media tool in the Rich Content Editor. The resulting media files can be downloaded and then uploaded to 3C Media Solutions for captioning or transcripts. See instructions on the Multimedia Accessibility page.
When searching for third-party videos to add to your course sites, visit the Third-party video sources page first to see good sites that will likely have captioned videos.
Color and contrast
The Canvas interface has been created to be accessible to those who are color blind. When choosing colors to apply to text or background colors, make sure there is adequate contrast between colored text and the background color. The Distance Education Assistive Technology Specialist will check to make sure colors that the instructor chooses pass accessibility compliance thresholds in course accessibility reviews and assist instructors on choosing colors that provide sufficient contrast.
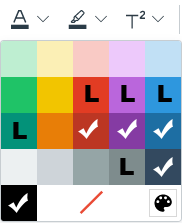
Changing colors for text and background colors to text is done in the Rich Content Editor using the Text Color and Background Color icons in the toolbar. These tools allow you to pick colors from a small palette. The screen shots below show what text colors are accessible on white, and what text colors are accessible on black backgrounds.
To choose colors outside of these colors that Canvas gives you, it is recommended that you use either the built-in Accessibility Checker in Canvas from the Rich Content Editor, or the UDOIT tool, which will give you an interface for choosing colors and applying them.
✓ = accessible colors L = colors that are accessible only for large text (Header 2, or 24 px and larger)
ADVANCED: setting colors in HTML
NOTE: now with UDOIT and the Canvas Accessibility Checker, you no longer have to go into the HTML to use colors outside of what Canvas gives you. If you would prefer to edit in the HTML, use the following steps. You will need to access the HTML by clicking on the HTML Editor link at the top, right of the Rich Content Editor toolbar. If you choose a color from the Canvas palette as described above, the code is in place using <span> tags to surround the text you want to color and applying inline CSS style code: <span style="color: #008000;">. Once you identify a color, you will need the hexidecimal code, a 6 digit (or 3 digit) number or HTML color name you can paste into this code, replacing the 6 digit number.
See the WebAIM Color Contrast Checker to choose colors with sufficient contrast to pass accessibility standards.
- Leaving the background color at white (in most cases, you will not be changing the background color), click on the color swatch for Foreground color and choose from the color spectrum.
- Check the results under Normal Text or Large Text depending on your situation.
- You want your chosen color to pass for WCAG AA level. More contrast is needed for normal size text than large text.
- If the color selected does not have sufficient contrast, click on the darken link. Watch to see when you get a Pass.
- Copy the code for the passing color and paste it in to the HTML replacing the color values in the HTML.
Color as an indicator
Do not use color as an indication for location on a page. Consider using a heading when referring to an area of the page.
Canvas High Contrast Feature
Low vision and color blind users who need more contrast for text and interface elements may want to use the "High Contrast Styles" feature in Canvas. This option can be found in the User Account > Settings > Feature Options area (at the bottom of the page). See the "How do I enable the high contrast user interface as a student?" page and the "How do I change my User Settings?" Canvas guide and turn on feature at the bottom of the page. Note that with the High Contrast feature turned on, the left side Global Navigation bar will revert to gray and lose the SRJC branding.
Tables
Data tables that have a row or column of header cells need to have code that indicates to a screen reader that there are header cells. TH tags in the code behind the scenes associates the header cells with the appropriate data cells. The scope attribute added to the TH tags will help further by identifying a header cell as either "col" for column or "row" for row.
The example table below shows column header and row header cells. In the majority of data tables, column headers are needed. Some tables do not have data that would require any header cells, and some tables need both column and row header cells indicated.
| Col Header | Col Header | Col Header | Col Header | Col Header | |
| Breed | Type of Breed | Coat | Lap Cat | Adult Weight | |
|---|---|---|---|---|---|
| Row Header | Bengal | Hybrid | Short | No | 15 |
| Row Header | Scottish Fold | Natural/Mutation | Short | No | 9 |
| Row Header | Siberian | Natural | Long | Yes | 14 |
| Row Header | Tonkinese | Crossbreed | Short | Yes | 10 |
Setting the Table Cell Properties
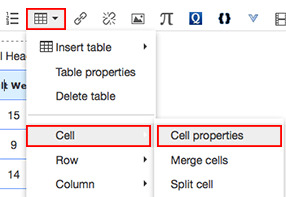
To set the header cells of a table to have code for accessibility, click on the Edit button for a page to enter editing mode and reveal the Rich Content Editor. Click on a cell in the table and then click on the table icon in the Rich Content Editor toolbar to access a drop down menu. Choose Cell > Cell properties. Set the Cell type to Header cell, and the Scope to Column or Row depending on the type of cell.
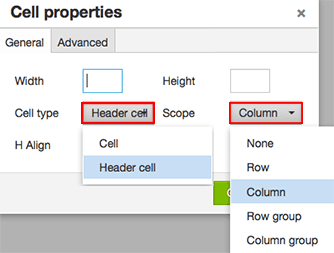
Table Caption
If the table is a complex one, it may be helpful to include a table caption. A table caption will show visually on the page above the table and is helpful to give the screen reader user an idea about what the table data is before the reader starts in on reading each cell. To add a table caption:
- Click anywhere in the table
- Click on the table icon in the Rich Content Editor toolbar to access a drop down menu
- Choose Table properties
- In the General tab, you will see a Caption check box. When clicked on, a field to enter a table caption will appear in the Rich Content Editor.
Set quizzes to give extra time for students with disabilities
If one of your students needs a time-extension accommodation, you can set up your exam in Canvas so that this student, and only this student, has extra time. See the "Once I publish a timed quiz, how can I give my students extra time?" canvas guide for instructions on how to do this under the section called “Adjust Additional Options”.
Assignments by Group
You can create custom assignment dates for students needing accommodations by placing them in a student group. See the "Creating Assignments for Groups or Individuals" canvas guide for more information.
Math Editor
In the Rich Content Editor, you will find an Insert Math Equation icon (Pi icon). Clicking on the icon opens the Math Equation dialog box to create your equations. Canvas will render the equation as an image with correct LaTex code provided as alternative text. This is fully accessible to the screen reader user. See the "How do I use the Math Editor in the Rich Content Editor?" Canvas guide for more information on using the Math Editor.
Links
Repeating hyperlink names on a page
This is an issue that tends to show up when an instructor sets up links to quizzes or other generically named links. The instructor makes a hyperlink to each quiz and the name of the link is the same for each quiz. So, there could be eight links on a page that all say "Quiz". This practice will make it hard for the screen reader user to decipher, especially if they search a page for all links (a common practice). Instead, make your links more descriptive, such as Quiz 1, Quiz 2, etc.
Meaningful, Descriptive hyperlink text
Avoid making links with generic text such as "click here". Make the link text descriptive of where the link takes you. For instance, instead of:
Click here to get Adobe Reader
do this:
Get Adobe Reader
Helper Applications
If you link to PDFs, QuickTime, Flash movies, or any other file that requires the student to have a helper application, also make a link to where the student can download the application, applet or plug-in needed. Put the link in a prominent place, ideally next to the place where the file is linked to, or on your Syllabus page.
Common helper application links
- Adobe Reader http://get.adobe.com/reader/
- Open Office https://www.openoffice.org/download/index.html - When linking to Word docs (or other Microsoft Office documents), be sure to also provide a link to Open Office.
Contact the Instructional Accessibility Specialist if you are still using Flash videos, they will likely not work on most browsers.
External Sites
One of the stickiest issues is the use of outside sites for required content. The unfortunate fact is that the vast majority of commercial sites are not compliant with accessibility laws (and a surprising amount of government and education ones, too). Linking to a non-compliant site and making it a requirement for the students to go there can cause a problem with passing an accessibility review.
Strategies for using external sites
- If at all possible, make external sites optional material and clearly state that the material is optional where you link to it.
- If some of the content on an external site is required, write text to cover the content required, put it on your site, and then make the external link optional.
- For publisher sites, contact the Distance Education Assistive Technology Specialist to do a test on the site. Start this process early, well before your accessibility check if possible. If the site fails, the publisher needs to be contacted and informed about their non-compliance. The Dean of Learning Resources and Educational Technology will pursue putting pressure on publishers to become compliant. As a back up, look into alternative publishers.
- If publisher (or other third party) content is a major part of your class materials and will require a serious overhaul of your class, consider asking for an extension.
How to test sites using WAVE
If you are linking to external sites, you may want to test them yourself. This can easily be done by going to the WAVE site and inputting the URL of the site to test. If there is password protection used on the site, you will need to use the WAVE toolbar that can be installed in the Firefox browser. Watch the movie about testing with WAVE.
After running the test, there will be a yellow bar at the top of the page will alert you if there are any accessibility errors. The page will have a number of icons appear. Red icons show where there are accessibility errors. Green icons show where there are elements that pass 508 compliance standards. Yellow icons point out items that should be looked at more closely to determine compliance.
External sites with errors
If you need to link to an external site and also need it to be mandatory for your students, take note of the guidelines listed below.
- The Distance Education Assistive Technology Specialist is available to evaluate third-party links, and will do so for accessibility reviews.
- Sites that have a limited number of errors that will not interfere with the necessary content being read correctly by screen readers will not be a concern. .
- Sites with accessibility issues that present a boundary to disabled students will be identified, and strategies will be discussed for addressing the boundaries, such as offering alternatives for the disabled students.
Linked Documents (PDFs, Word, PowerPoint)
When linking to documents such as PDFs, Word documents, or PowerPoint presentations, first ask yourself if the content would be better served to be delivered on a Web page (Canvas page). Web pages are the easiest to make accessibility compliant and tend to be more accessible to those using screen readers. Certainly, if you are going to be creating the content for the first time, creating Web pages is the best choice. That being said, there are definitely times when PDFs and Word documents need to be used. If you have PowerPoint files, you will need to adapt them for use online.
PDFs
All PDFs that you link to that are required reading can be a boundary for visually disabled students. Whether the PDF was created by you or acquired from other sources, need features added to work well for screen reader users. Very simple, short PDFs are accessible to screen readers without much extra work, but most do require work to be made accessible. Optional PDFs supplied as supplemental information but not realistically necessary to do well in the class will not be checked for accessibility in a review, but the recommendation is to also make them accessible.
If you have PDFs that need adjusting for accessibility, the Distance Education Instructional Accessibility Specialist will assist you. When creating your own PDFs, it is best to follow the recommended creation of Word documents and Preparing InDesign Files for Accessibility (Adobe's site). For more information, see the online tutorial on Creating Accessible PDFs.
In Canvas, you will have the option to embed a PDF into a Canvas page using a widget. The viewer will not need to leave the Canvas page, either to retrieve it or to view it in a PDF reader, and this is a help for the screen reader user.
Word documents
Word documents can be read by screen readers. Correctly formatting your Word documents will help in creating accessible documents. Basically, you should use Word's built-in styles, add alternative text to images, and for data tables turn on the feature that allows header rows to repeat on each page. See the sections on formatting Word documents in the Creating Accessible PDFs online tutorial.
PowerPoint files
PowerPoint files can be used with various assistive computer technologies, but most screen readers will need the presentation be in an HTML format to access them. If you post a PowerPoint file on the Web, you need to also post an HTML-based version to ensure maximum accessibility. See the online tutorial on PowerPoint Accessibility for choices of how to make an accessible alternative to a PowerPoint presentation. It is recommended that you also offer the PowerPoint file as a PDF—a simple saving option from PowerPoint. Contact the Distance Education Assistive Technology Specialist to assist you in making the PDFs accessible.
Sensory Characteristics
Be mindful of creating instructions with visual cues that refer to shapes, colors, and location that will not be perceived by disabled users. Consider using a heading when referring to an area of the page.
Animations
Do not use blinking animations unless the flash is less than 3 times per second, or is sufficiently small and of low contrast. Flashing content that has the color red should especially be avoided.
