When creating Word documents to deliver online or otherwise require your students to access, it is important to make sure they work well with assistive technology so that disabled students can easily access the information. This page will cover several things you can do to make Word documents more accessible and explore the Accessibility Checker in Word (added to the PC versions of Word, version 2010 and later).
What Makes a Document Accessible?
- Can be accessed without purchase of extra programs or readers
- With Open Office, students have a free program to access Word documents
- You need to link to Open Office (https://www.openoffice.org/download/index.html) in your course materials to pass accessibility compliance
- Can be read from a screen reader and other assistive technologies for the disabled
- Can be searched for headings, form fields, etc.
- Structure of document remains intact so that screen readers read the document in correct order
- Non-text elements, such as images have text descriptions
Document Title
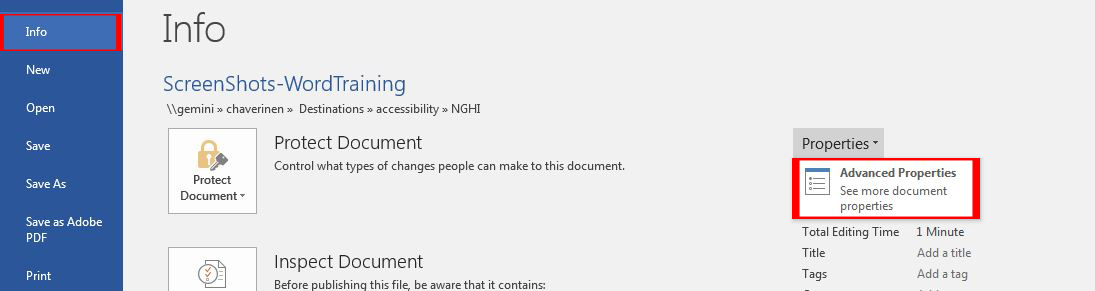
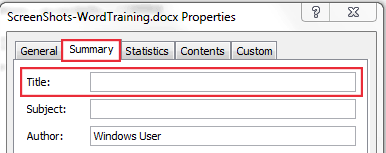
When a document is first opened, screen readers will read the document title as opposed to the document name. Set an appropriate title for the document in Document Properties.
- Word 2013, Word 2010, from the File tab select Info and then Properties.
- In Word 2007, click on the Microsoft Office Button in the upper, left corner, point to Prepare, and then click Properties.
- On a Mac, choose File > Properties.
Headings
The longer the page, the more important it is to use headings. In fact it may be one of the most important things you can do to make your documents work well with assistive technology, such as screen readers. Headings allow the screen reader user to scan a page or easily jump to the content they need. Do not simulate headings by just adding bold to text. Use true styles in Word, such as Heading 1, Heading 2, Heading 3, etc. These structural heading tags will travel with the document when exported from Word as an HTML file and in some cases when exporting as a PDF file (see the Accessible PDFs tutorial page for more information on exporting to a PDF in the best manner to preserve accessibility settings).
Ordering Heading Styles
Be sure to use the heading levels in logical order based on the hierarchy in the document. For example, a Heading 3 should be a child of Heading 2. Do not skip Heading levels, e.g. following a Heading 3 with a Heading 5. You can go back to a previous heading level, if that best describes the hierarchy of your content, e.g. following a Heading 3 with a Heading 2.
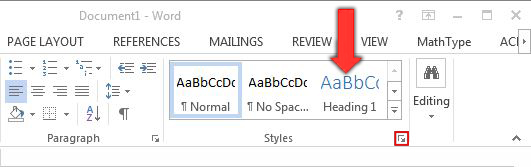
Apply Heading Styles in Word 2013, 2010, 2007
Have the Home tab selected, choose a style right from the ribbon or click on the Change Styles dialog box launcher to open the Styles palette.
Apply Heading Styles in Word for Mac
Choose your styles from the Formatting palette.
Apply Heading Styles in Word 2002-2003
Choose your styles from the drop-down styles list.
Other Text Formatting Considerations
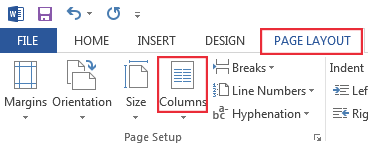
- Use the Column tool for multi-column layout to ensure correct reading order on assistive devices
- You can find the column button in the Page Layout or Layout tab
- Don't use tabs or spaces, avoid repeated blank characters
- Additional spacing will be read by screen readers
- Use paragraph spacing instead of additional carriage returns
- Avoid using Text Boxes
- Avoid complex layouts, sidebars, etc. for less problems with reading order
- Use standard fonts of at least 11 points
- Sans serif fonts such as Helvetica, Arial, and Calibri are preferred over Serif fonts such as Times New Roman to work better with screen magnification
- Avoid fonts such as "Wingdings" or other ASCII fonts that do not have a Unicode character set
- Create lists using the Bulleted or Numbered Lists commands, don't make "fake" lists by typing in bullets or numbers
Images
Add alternative text to images, charts, graphs, etc. Alternative text are descriptions of images, etc. that are read back on screen readers for the visually impaired. Note that in Word 2004 and 2008 for Mac you cannot add alt text to images. In Word 2011 for Mac (with update to 14.1 or later versions) you are able to provide alternative text. Do not add "image of", "picture of", or "graphic of" for the alternative text. Make alternative text descriptive, yet concise. See the WebAIM: Article on alternative text for more tips on writing good alternative text.
To add alternative text in Word 2013, Word 2010, and Word for Mac 2011
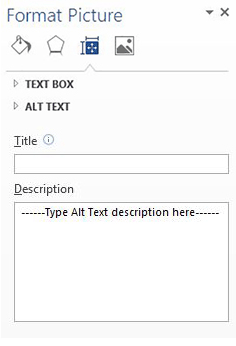
Word 2013 Format Picture dialog box
- Right-click the image
- Choose Format Picture from the pop-up menu
- In the Format Picture dialog box, select the Alt Text tab in the sidebar
- Two fields appear, one labeled Title and one labeled Description. Enter a description of the image in the Description field, NOT the Title field
To add alternative text in Word 2007
- Right-click the image
- Choose Size from the pop-up menu
- In the Size dialog box, select the Alt Text tab
- Enter a description of the image in the Alternative Text box. Note that by default, Word has created alt text based on the image file name. Change as needed to be truly descriptive.
To add alternative text in Word 2000-2003
- Right-click the image
- Choose Format Picture from the pop-up menu
- Enter a description of the image in the Alternative Text box
Formatting Data Tables in Word
- Use true tables – do not use tabs, spaces or columns for sets of data
- Create simple tables
- Don’t nest tables
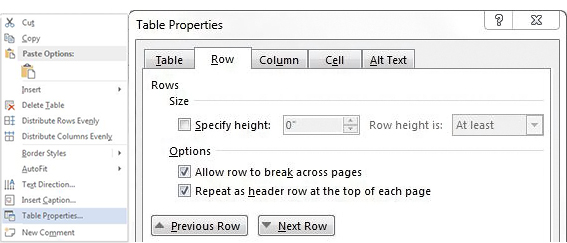
- If you have a header row and your table may span more than one page, you need to do the following:
- Repeat header row over pages:
- Select header row
- Right click, on the table, choose “Table Properties”
- Select “Repeat as header row at the top of each page”
- Repeat header row over pages:
Data Table Column Headings
If you have a header row, Word has a setting that will make sure your table has structural tags behind the scenes to designate your first row as header cells. Only use this setting if you in fact have header cells - meaning that your table has cells in the first row that describe the data in the cells below. To designate table headers:
- Click anywhere in the table
- In the ribbon of tools at the top of the interface choose Design tab in Word 2013/2010. In Word 2011 for Mac go to the Table tab.
- Click on the Header Row check box to ensure it is checked.
- Type your column headings, you will need to retype them if you already have column heading text
- Press the Enter key
A Header row actually sets a row of column headers to the first row of a table. There is no way to set row headers for accessibility purposes, which would be a column of row headers.
Hyperlinks in Word
- Use meaningful text that makes sense out of context – do not use “click here”
- Using the Control + K keys will insert hyperlink
- Click on “Screen Tip” button in the Insert Hyperlink dialog box to add description of link as needed
- The Hyperlink will stick with document when exporting to a PDF
- See this article on Links and Hypertext that describes how to write good link text
Use of Color
- Documents using color should be understandable for people who can’t perceive color
- Use high contrast between background colors and text colors
Word Accessibility Checker
Starting with Word 2010, Microsoft added an Accessibility Checker that can help check a document for accessibility. Though the checker will not locate all accessibility issues, it is a useful aid to creating accessible documents. The checker will scan a document and issue a report of Errors, Warnings, and Tips and offer information on fixing the issues. Keep in mind that many things need to be checked with careful evaluation outside of the checker, such as color contrast, meaningful alternative text or hyperlink text, and proper use of headings.
Test a Document with the Word Accessibility Checker
- From the File tab, Select the Info menu option
- Next to "Inspect Document", click on the "Check for Issues" button and then the "Check Accessibility" menu option
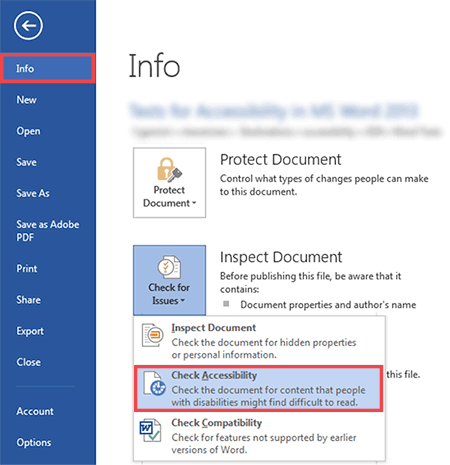
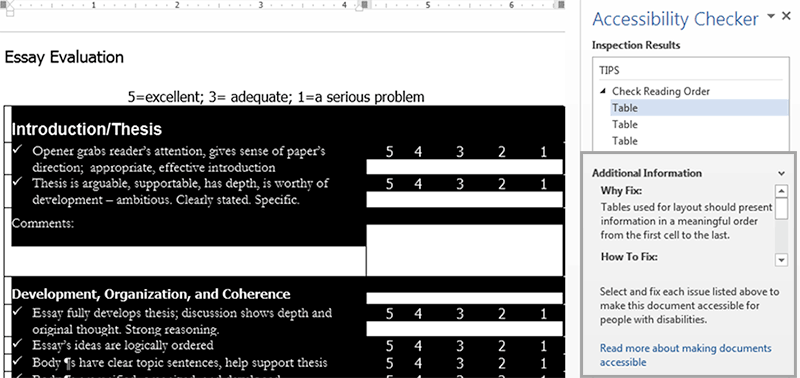
- Look to the right side of the interface to see the Accessibility Checker Inspection pane showing the results.
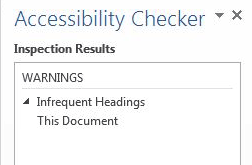
- When clicking on an item in the Inspection Results, the element will be highlighted in the document view, and at the bottom of the results pane you will see under "Additional Information" a description for "Why Fix" and a list of "How To Fix".
Violation examples
- Organizing content using paragraph headings
- Providing alternative descriptions for images
- Identifying table headers
- Using meaningful link text
- Grouping related list items
