Caption Your Videos

Why Captions?

Accurate video and audio captions are one of the most important means of ensuring that all of your students have access to your course content.  In addition to the hearing impaired, video captions are helpful to many different groups: those who understand better when presented with written information, those who do not have a quiet environment to watch the video, those who are watching a video in their non-native language, when the speaker has an unfamiliar accent, and so on.

Ensuring that the videos that you use in your course are captioned is easy once you take the time to learn about the variety of captioning tools and options that SRJC and the CCC system have provided. 

What Are Quality Captions?

You can tell that a video's captions are high-quality if they have the following characteristics:

  • Accurate punctuation & capitalization
  • No more than two lines of text per caption
  • Captions are synchronized with the audio
  • Different speakers are identified
  • Readable

Is it Okay if I just use auto-captions?

In many cases, auto-captions are sufficient.  For example, the auto-captions from Canvas Studio are generally high-quality.  However, auto-captions always need to be checked by the instructor for accuracy, are likely not sufficient when:

  • The video covers highly-technical information
  • The speaker has an accent that may be difficult for auto-captioning tools to recognize

Captioning Options

There several different workflows that Distance Education recommends for captioning video based on the length of the video, the video creation platform you prefer, and whether the video was made by you or a third-party.

  • Short Instructor-Created Videos (under 5 minutes long)

    Studio Icon
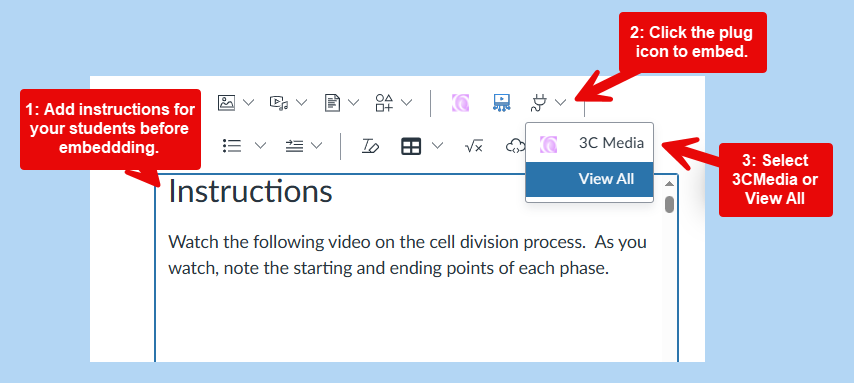
For shorter videos, the easiest method to caption them is to use the auto-captions provided by Canvas Studio and then edit them yourself.  Once you are accustomed to this workflow, it will only take you a few minutes to correct the captions on a short video and embed the video into your course.  

    Step 1:Upload Record Your Video in Canvas Studio

    If you already have the video file, upload it to Studio. Or, record a new webcam or screencast video using Studio's recording system. Refer to the links below for additional help. Note that when recording in Studio there are slight differences in the instructions based on which browser you are using.

    Upload Video Files To Studio

    Record using Chrome or Edge Browsers

    Record using Safari or Firefox

    Step 2: Request Auto-Captions, Review, Edit & Publish

    Studio auto-captions are quite accurate. They automatically add capitalization and punctuation.  However, to be sure they are accurate, you should review them before publishing.  Follow the instructions below to complete this process.

    Step 3: Embed your Studio Video in your Course

    You can place the video into your Canvas course using the Canvas Studio embed tool. 

    Follow the instructions below based on which browser you are using:

    Additional Studio Capabilities

    Canvas Studio is a robust tool, that allows you do edit your videos, add annotations, add video quizzes, track student views, etc.  You can even record Studio videos while editing a Canvas page.  Students are also able to use Studio to record, edit, caption and submit video assignments. To learn more, browse the Studio support guides.

  • Longer Instructor-Created Lecture Videos (over 5 minutes long)

    " "TechConnect, or 3C Media Solutions, is a platform provided to us by the Chancellor's Office for storing, captioning, and delivering videos and other media. You can order quality captions for your videos and embed them into Canvas in 5 steps.

    NOTE: TechConnect will only caption instructor-created or videos for which you have copyright or that has a creative commons license.  Learn more at Information on Creative Commons License from TechConnect.

    Step 1: Register for an Account

    Register for an account with your CCC email address.  

    Step 2: Request Permission to Upload Media

    Follow the instructions to request permission to upload media. Allow 48 hours to be granted permission to upload. You only need to make this request once.

    TechConnect's Requirements for Captioning Eligibility

    • Be instructor-created for student use only
    • Have clear audio
    • Be in English
    • Not be mostly music
    • Not to be submitted for practice or experimentation
    • Not for Media that has been linked from YouTube

    Step 3: Upload Your Video

    Step 4: Order Captions for Your Video

    Once your video has uploaded completely, review this Captions Request Guide or follow the steps below:

    • From your "Media" tab, click the "Details & Options" link to the right of the media you want captions for.
    • Click on â€śSubmit this Media for Captioning."
    • Fill out and submit the form. 
      • NOTE: For better quality control, provide a list of vocabulary terms or phrases you use in your video specific to your subject.   
    • In the "Caption Type" drop down choose "human generated."
    • Once created, (usually within 5 working days, depending on length), the caption files will automatically appear.

    Step 5: Embed Your Captioned Video into Canvas

    You can place the video into your Canvas course using the 3C Media embed tool. The best practice is to embed the video so that students can watch in Canvas, instead of having go to the TechConnect website.

    Follow the steps below or view the video Embedding 3CMedia Content in Canvas from Los Rios College, which is at the very bottom of that page:

    Screenshot of 3CMedia App interface in Canvas

    • In Canvas, navigate to where you want to place the video.
    • Click on the Edit button.
    • Add instructions for your students: why they are watching, specific questions or issues they should focus on, how the video relates to other content or assignments, etc.
    • Place the cursor where you want to embed the video.
    • In the editing bar, click on the Plug icon (you may need to click the three dots to expand the editing menu to see it).
    • Select 3CMedia if you see it, or View All and then 3CMedia.
    • The system may prompt you to log into your 3CMedia account.
    • Select the Insert button next to the video you want to embed.
    • Save the page.

    Additional Resources

    Visit the TechConnect Cloud Support page for more information.

  • 3rd-Party Videos (YouTube, Vimeo, etc.)

    If you need captions for a Youtube or other third-party video, submit an Accessibility Support Request form via DE's support request system.


Button_Contact DE Support